Do you ever have trouble with Revit Materials?
Are images not showing up, or your materials gray in realistic mode? Are you new to Revit materials and just looking for an introduction to how to properly link and use them in your Revit projects?
This BIMsmith Revit tutorial addresses common issues with linking and transferring Revit materials in Revit projects.
Related Video: Revit Materials 101: Intro to Revit Material Libraries
Watch (5:25):
SYNOPSIS
Revit Materials 101: Relinking Images and Transferring Revit Materials
First, let’s define some terms – a Revit material is a combination of identity data, graphic representation data and an appearance asset at a minimum. It can also contain physical and thermal information for some of Revit’s advanced analysis features, but that’s a topic for another video.
The appearance asset controls how the material will look in realistic mode and when the material is rendered and can be made in a couple of different ways. One option is to use a specialty asset like metal or paint and simply assign an RGB color code. Another option is to use an image or images for a custom material.
However, to save on file size, those images are not imported into the Revit project. By default, Revit has a large library of textures on your local computer that it will use for the out of the box Revit materials. Occasionally, we will tweak these to create the look of a manufacturer’s material, but most of our materials use custom images created from actual product photography, and these custom images are provided in a download along with the Revit project.

When you download a product from BIMsmith Market or BIMsmith Forge® that contains custom images, your download is a zip file with the Revit project and with all the images you need to make the materials work. However, we often get questions from architects who open those Revit projects and have materials that don’t re-link and appear gray in realistic mode and have errors in the material manager. The best way to make these materials work is to set up a rendering location folder for Revit.
Rendering locations are folders on your local computer or your network server that you tell Revit to look in to relink any images. If you’re working on your local computer, we suggest creating a folder under Documents called "BIMsmith" and copy and paste all the images you download from Market and Forge here – this is how the BIMsmith Plugin works.

If you work on a network, with other people, you should set up a folder in a common location that everyone can access. This way, when your coworker opens a project and adds materials, your Revit can look in the right place for the custom images. For this to work, you’ll need to do the following steps on all your networked computers.
To add a rendering to Revit go to File then and click on “options” at the bottom, then select the "Rendering" tab on the side. Now copy and paste the location of the folder that you created in the previous step and Revit will look there for images. Now when you download something from Market and Forge, first copy the images to your folder, then open the Revit file and the images will automatically load.
Next, let’s talk about getting those materials out of the project you’ve downloaded and into the project you’re working in.
When you download an assembly that you’ve configured from BIMsmith Forge, you can copy and paste the assembly from the Forge project to the job you’re working in. To do this, on the project sheet, double click on a view to activate it and select the assembly. Simply copy and paste the wall, floor, roof or ceiling assembly that you customized in Forge to the job you’re working in. Now you can either create a new instance or use match properties to replace a generic system family. Keep in mind your system family has the name you gave it on BIMsmith Forge.

But we know that sometimes you already have the perfect system family and you just want to update a layer or two with new materials. Let’s say you have a brick wall that you’ve been using forever, but it uses that awful default Revit brick. You can create a wall on Forge with just one layer – just containing a brick that you want to use to replace the default Revit brick. Once you’ve built that wall and downloaded it, you can copy and paste it into your working project.
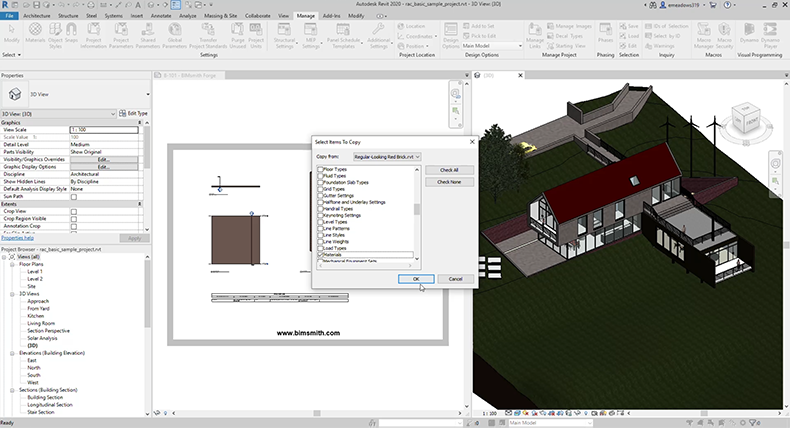
But if you don’t want the system family to clog up your working project – you can transfer just the materials by using the “Transfer Project Standards” tool. Go to the “Manage” tab in the receiving project (the one that you want the materials to end up in) and click on “Transfer Project Standards.” In the dropdown menu at the top of the dialog box, select the project that you are transferring materials from. Then uncheck all options and select only Materials.
Now you can go to the system family and edit the wall you’ve been using with the Revit brick and replace it with the brick material you downloaded from BIMsmith Forge. You could even make a wall with several different kinds of brick and download them, then try each to see which option you prefer.
The transfer project standards tool is great, but sometimes you don’t want all the materials. In this case, you can create a generic wall, and use the paint tool to put the material you want on that wall, then copy the wall into your project and it will bring the material with it.

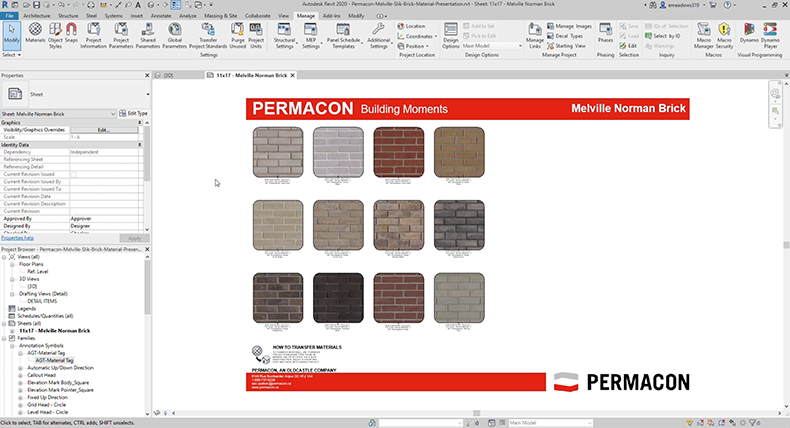
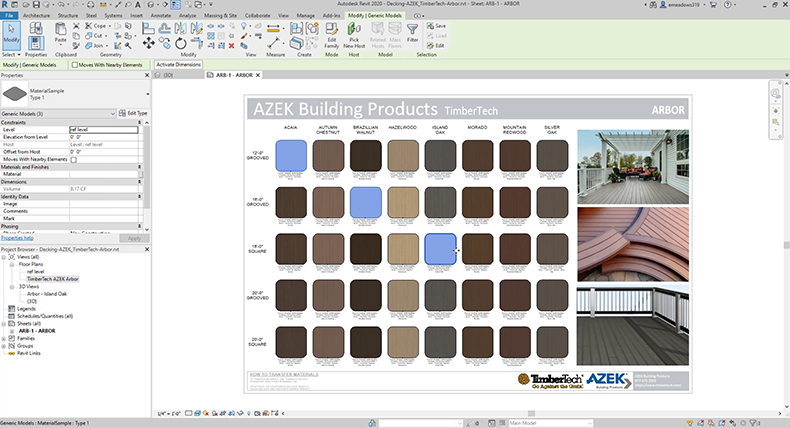
If you download a project from BIMsmith Market, there are usually way more images and materials than in a Forge project. Most of our BIMsmith Market product libraries have entire product lines from a manufacturer. In these projects, we have created sheets with material swatches for each material offered. Simply activate the view on the sheet, select the material swatch or swatches that you want, and copy them into your working project.
The swatch is an extremely simple Revit family and won’t add to your file size, but we recommend deleting the family from the browser when you’re done.
This has been a starter guide to Revit materials – hopefully this helps you with your next project.
--
Check out the BIMsmith beginner's guide on how to find and download Revit material libraries.
--
![]() BIMsmith is a free cloud platform for architects, designers, and building professionals to research, select, and download building product data. Search, discover, compare, and download free Revit families on BIMsmith Market, or build complete, data-rich Revit wall, floor, ceiling, and roof systems faster with BIMsmith Forge.
BIMsmith is a free cloud platform for architects, designers, and building professionals to research, select, and download building product data. Search, discover, compare, and download free Revit families on BIMsmith Market, or build complete, data-rich Revit wall, floor, ceiling, and roof systems faster with BIMsmith Forge.


This is what i exactly was looking for, thank you.
Huh?